• Ahoy and Welcome to the New SSS Forums!!

    As you can see, we have migrated our old forums to new software. All your old posts, threads, attachments, and messages should be here. If you see anything out of place or have any questions, please scroll to the very bottom of the page and click "Contact Us" and leave a note with as much detail as possible.

    You should be able to login with your old credentials. If you have any issues, try resetting your password before clicking the Contact Us link.

    Cheers
    - Bryan

Getting Ready for SHTP 2021

AlanH

compulsive typist
I gave George McKay the emergency rudder that I build as a trial run for the Wildcats new primary rudder last year. He's using it on his Capo 30 (modified to 33 feet) "Skye", so I need to make another rudder. The E-rudder I made then was a bit of overkill for an S2 7.9, though according to George, it steered Skye just fine in 10-13 knots of breeze and some swell. It'll go to Hawaii with Skye on the next Pac Cup. That confirms that the basic method works, so here we go again. Skye's rudder had a 15 inch chord and was almost 7 feet tall.

I'm not a big fiberglass guy. I mean...I'm not high-tech. With advice from Greg Nelson, and after borrowing some pumps etc. from him, I vacuum-bagged the Wildcat's primary rudder, and it's tight. Skye's rudder was a dry-run for the primary rudder and I bagged that. It didn't go as well but what I learned from doing that, made the primary rudder better, so it's all good. However, this time, I'm going to do it low tech, no vacuum bagging.

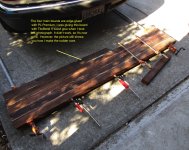
The core of the rudder is 2 x 3 redwood. Why? Because there's a huge pile of 12 and 16 foot pieces of this stuff lying in an empty lot down the street and it's free. I used it for Skye's rudder...it works. this will be smaller than Skye's rudder, so seems good to me. The pictures are deceiving, as I was trying to glue on a piece in the bottom of the rudder, the leading edge to make it balanced. I was using TiteBond II, which has zilch gap-filling ability and it just didn't work. So I knocked it off with two whacks from a hammer and I'm back to a 12 inch-chord, straight blade. That's the four "Main" edge-glued boards in the picture. That will be plenty big enough.
e-rudder-1.jpg

Here's the rudder core, clamped on my driveway, where is where I do all my low-tech work. The glue holding the four remaining pieces, glued up edge-wise, is PL Premium polyurethane construction adhesive. PL Premium is cheap. It gap-fills just great. It's strong as #$%^&*...lots of the DIY boat guy use it for quickie plywood-panel boats. I used to use it to repair cabers for the Highland Games. the wood failed before the PL Premium, ever did. I make up some test joints when I built Skyes e-rudder and tested them. The redwood failed before the joint did.

This rudder is 6 feet tall and will have a 12-inch chord, maybe a scooch more, like 12.5, when I'm done with the fiberglassing.
 

Attachments

  • e-rudder-1.jpg
    e-rudder-1.jpg
    407.4 KB · Views: 4,277
Last edited by a moderator:
Dimensions are...

Overall length, 6 feet...will be 5' 10" when I trim off the ends...
Chord .. 12 inches
Thickness.... the boards are 2 inches thick... a REAL two inches, not the 1 3/4 of standard "2 x 4"'s. However, it'll be planed down to about 1 3/4 inches thick. Add in the thickness of the tri-axial fiberglass, and we're back to about 2 inches thick.

Above waterline, 2 1/2 feet, below the waterline, 3 1/2 feet. Let's focus on the below-waterline area.
The 12 inch chord , converted to metric is 30.5 cm.
The 3 1/2 feet depth, converted to metric is 106.7 cm

So my emergency rudder will have about 3254 sq. cm of underwater area.
I'm just thinking about the general rectangular shape of the blade, not accounting for shape......so not surface area.

A J-24 rudder, which would be a touch small for the S-2 7.9, but not by much, has a submerged chord length of 30 cm and a submerged depth of either about 89.0 or 95.5 cm depending on which picture you look at on the class rules...I can't figure it out. Would a J-24 rudder control an S2 7.9? Sure. Is it a "keep racing" rudder or a "get home" rudder? I'm thinking, somewhere in between.

Those numbers give a submerged area of 2670 sq. cm or 2865 sq. cm for the J-24 rudder.

So my e-rudder has significantly more surface area, underwater, than the J-24 rudder.

The maximum thickness of the J-24 rudder is 3.9 cm thick.
If I say my rudder will have a final maximum thickness of 1.8 inches, which is about right, that's 4.6 cm

So my rudder is a bit thicker than the J-24 rudder...should be a little bit "grippier" if not as fair and fast.

CONCLUSION...if the J-24 rudder would steer the S2 7.9, and I think it will, then this should be fine.

How does it compare to the rudder I built as the Wildcat's primary rudder?

which is actually a tich larger....but nowhere near as thick, as the One Design rudder.

The Wildcats primary rudder has an underwater chord of 13.5 inches / 34.4 cm. The submerged blade is 44 inches / 111.7 deep. That gives a total submerged area of 3842 sq. cm.

compare the e-rudder area to the primary rudder area... 3254 sq. cm / 3842 sq. cm = .85...so my e-rudder is 85% of the area of the primary rudder.

I'm good with that!
 
Last edited:
OK, today I spent about 90 minutes getting some shape into the rudder blank. I started with my favorite crude woodworking tool, the drawknife. This redwood has some knots, and therefore some grain distortion, so I accidentally knocked out some chunks that will need fairing, later. That's all right.

IMG_1765.JPG
 
After spending some time with the drawknife, I moved onto more wood-hackery tools...namely a surform plane and a really coarse disk on my drill. Between judicious use of the surform plane, with occasional intervention from the drawknife, and grinding down the harder wood of the knots with the disk, I managed to get a halfway decent shape in the leading edge of the blade, and smooth the junction between the first and second boards.
IMG_1767.JPG

Not-so-gentle ministrations of 100 grit sandpaper on a long block faired the leading edge to "round-ish", though it's not by any means elliptical. If I can get a really nice trailing edge I might go back and thin out some of the leading edge again.

IMG_1772.JPG
 
The way I glue up the boards, the trailing edge board had a huge knot in it at the bottom. That was going to be a pain to fair, so I decided to just round off the bottom of the trailing edge and tell everybody that it's an "elliptical" shape, which will reduce turbulence as the attached flow leaves the rudder surface. This is garbage, but what the heck.

I spent about 45 minutes with the belt sander, thinning the trailing edge and working a taper through the back two boards. There's actually quite a lot of that left to do, and the trailing edge is nowhere near straight yet, but it's progress!

IMG_E1769.JPG
 
Todays three hours of rudder work began with more shaping with the surform plane and belt sander. I spent the majority of the time thinning the aft 1/3rd of the blade. I also sanded off all the old weathered wood up above the waterline and got down to clean wood, which will bond with the fiberglass much better.

IMG_1774.JPG

The underwater part of the blade is looking smooth and the aft 1/3rd of the chord is a reasonable taper down to a roughly 3/16th inch trailing edge. That edge is not perfectly straight, but it's not bad and this IS an emergency rudder, after all. Putzing with the belt sander had produced a happier-looking leading edge as well. It's not really elliptical, but it's "more" elliptical than it was yesterday evening.

IMG_1775.JPG
 
I've been toying with the idea of not using a cassette at all. This e-rudder weighs about 18 pounds right now. Add the fiberglass sheathing and it's pretty surely going to be around 30 pounds. That's a lot lighter than any other e-rudder I've built. I know how I'll make the gudgeons..wood, fiberglass, 2-inch glass tape and carbon fiber, but the question is....put that stuff straight on the rudder and just have a blade, or build a low-tech cassette?

If I go with the "just a blade" route, it's less to carry on the boat. I will cut the aft edge of the upper half of the rudder at an angle, so the top of the rudder is a bit smaller than the underwater chord, which will save a bit of weight and space. Of course, then I won't have to deal with storing a cassette.
If I DO need it, if it takes me an hour or 90 minutes of cursing to line up the pins and gudgeons, does it REALLY matter?

On the other hand, a low-tech plywood cassette is braindead easy to build. You store the whole thing on the boat with the blade IN the cassette, so it doesn't take up that much room.

Whichever route I go, there's nothing to do quite yet, as any cutting of the upper half of the rudder will happen after it's fiberglassed
 
Two of the boards had some significant warpage, so they didn't glue completely flat. There's plenty of glue contact, so it's strong, but there are some big "dips". That's irrelevant in the blade, because SO much material gets removed, but up in the above-water part of the rudder, it'll make for some funky-looking fiberglassing. So I glue'd in some cheater bits, which I'll belt sand down flush with the rest of the rudder.

IMG_1778.JPG

IMG_1781.JPG
 
And finally, I mixed up some epoxy with redwood sanding "dust"...which is about the same size as the wood dough you can buy, and made some wood spooge/putty. That went on/into the two "oops's" that I labelled yesterday, that got hacked out a bit too deep with the drawknife. They will kick off overnight and maybe tomorrow I can hit 'em with the belt sander before work, we'll see.

IMG_E1780.JPG
IMG_E1779.JPG

All in all, this won't win any awards for super-fast rudder design...it's not as accurate as the primary rudder, where I routed out the foil shape using an elliptical template. However, it's reasonably smooth, plenty strong, and a reasonable shape.
 
After zilch progress for a few weeks, I took advantage of being off work for two weeks and the second sunny day in a row to work on the E-Rudder. Step One was to use the surform plane and belt sander to smooth down the "cheater bits" that I wrote about, two posts up. That didn't take too long, and since it was only about 1:00, I figured...why not fiberglass the rudder? So I dragged out the box with the extra-stuff left over from making the Wildcat of Loch Awe's primary rudder and pulled out what was left of the 24 ounce triaxial. There was enough, yay!! I laid it out on the rudder and while I wish it was an inch wider, it's close enough. Scissors time! .....and we're off!

First, I belt sanded down those bits that I filled in. You can see them in the post just above this. I got those pretty flush, and while the trailing edge of this rudder is by no means perfect, it's really not bad at all. It's almost as good as the Wildcats primary rudder. Next up was to paint on some epoxy, over the whole rudder. I learned, when I made those earlier rudders, that if you don't coat the wood, first, it will soak up epoxy and starve the glass weave. So on it went.
 
This was going to be a low-tech job, so I laid the 24-ounce triaxial fiberglass on, and starting painting/glopping resin on the cloth. I never mixed up too much resin/hardener as I was pretty sure I had enough to do the job, but I didn't want to waste it by having it kick off in the plastic mixing tub.

IMG_1832-sm.jpg

I did one side first. The rudder has 3/16 th's holes drilled in the end, and small screws were partially driven into them. The rudder hangs from those screws, which lie on the sawhorses you see. Well...DAMN...but one of them popped out and I had neglected to put a sheet of plastic on the ground under the project, so the rudder got a mess of dirt in it. I cleaned it up best I could with a brush and paper towels but there's some dirt in this layup. Dummy....one sheet of plastic would have saved quite a mess. All right, so I took the screws out and replaced them with some long nails, just shoved in the holes and that worked fine. This will still be plenty strong enough.

Anyway, I have one of those wedged fiberglass laminating rollers:
31JR4V6SEVL._SL500_AC_SS350_.jpg

So between using the dispo paintbrush to paint/glopp on the resin, and the roller to even the wet-out of the cloth, I just went at it for about an hour and 45 minutes.
 
Last edited:
Honestly, it all turned out pretty well. Some hand-smoothing and pulling was needed here and there, but nothing awful.

IMG_1858-sm.jpg

The weave filled in pretty nicely...you see see some dirt in the layup....dangit!

IMG_1860-sm.jpg

I got everything laid down pretty tight by about 3:30

IMG_1863-sm.jpg

The upper part of the blade, that will be inside the cassette, is in the lower left corner of that last picture. I didn't pay a lot of attention to the bonding of the glass to the wood along the front edge of the upper part of the blade right there, as about an inch and a half of that will be cut out. Why? To add some balance to the blade. That will expose the width of the wood core of course, but I'll epoxy on a strip of 6 ounce cloth just to seal it
 
Last edited:
It's going to be COLD here tonight, and there's a lot of humidity in the air. This morning there was ice on the back window of Joans car, so I thought it might be wise to cover the rudder.....tarp tent! This should keep the dew off.

IMG_1864-sm.jpg

Looks cozy inside!

IMG_1865-sm.jpg

Joan revolts at having epoxy kicking off in the garage now, so all my glasswork has to be outside. It's supposed to get down to 37 deg. F tonight, so the epoxy might not cure all the way by morning. I'm sure it'll be hard by tomorrow afternoon, though.
 
Here's a view of the cassette and original rudder that I built, deployed at the dock on George McKay's "Skye". This is the e-rudder we had for the LongPac.

cassette.jpg

See how the rudder body is cut back...the part that sits inside the cassette is smaller, fore-and-aft, than the underwater foil. The rudder drops into the cassette, but then it would wobble fore-and-aft, except that I made a "jammer"...another piece of the same wood that the rudder core is made out of. This is "jammed" into the back of the rudder, between the aft edge of the rudder blade and the inside-back of the cassette. That shoves the rudder forward and locks it into place. It should really have a retaining pin or something to keep it from falling out, but I made this cassette in a hurry.

The body of the cassette is 3/8 plywood. The fore and aft parts of the box are cut from 2 x 4 doug fir. The initial fastening of the cassette box was done with a mess of s.s. 1.25 inch deck screws that I had lying around from.....building the deck on my house.

Rudder pins..."pintles" are some 1/2 inch s.s. bolts I had lying around. The hinges on the cassette were laminated from alternating layers of 1/8 inch plywood and 10 oz fiberglass. They're 3/4 of an inch thick. The hinges are fiberglassed onto the plywood cassette with 1-inch fiberglass tape.

I think the weak point in this assembly is the hinges. If I were to re-do this, I'd make them thicker...more material, through which those 1/2 inch bolts go. The other possible weak point is that the cassette box could possibly rip off the lower hinge. I think I would double up the fiberglassing that attaches it.

The cassette for the rudder I'm making now will be very similar to this one, though I plan to make the hinges differently.

George has replace the 2 x 6 and wood fittings to which the cassette is attached with a stainless steel post, and welded brackets. Also, this rudder wasn't originally made for Skye. I sort of started with measurements roughly the same size as my S-2 7.9's rudder, as the whole point was to do a practice run, before making the S-2's primary rudder. If I were making the rudder specifically for Skye, the cut-back would be further up the blade, so there wasn't that awkward-looking gap at the bottom of the cassette box.

That said, this setup steered Skye in 15 knots of wind and some decent seas for a couple of hours - George and crew tried it out, even had the primary rudder tied off, 15 deg. off of centered.
 
Last edited:
Ants, I want to have the rudder and cassette ready to show off at the race, but I don't think I'll have the boat up there.

I'm doing this whole project with backyard technology and tools.... no fancy carbon anything, no vacuum bagging, no nuthin'. I hope this proves to others that they can make a solid rudder in their garage!
 
It's un-tented today, late afternoon and it's tight but wow...sticky! The cold weather means the epoxy takes a LONG time to cure. It's now in the garage, where it will be plenty cold tonight, but probably 10 degrees warmer than outside.
 
It's un-tented today, late afternoon and it's tight but wow...sticky! The cold weather means the epoxy takes a LONG time to cure. It's now in the garage, where it will be plenty cold tonight, but probably 10 degrees warmer than outside.

It's kicked off....the rudder looks really good, there' s tight bonding over the entire surface. This will be ~Strong~.
 
I cut off the flash today. Some of the epoxy still hasn't kicked so it's staying in the garage. However, the blade now weighs 22.2 pounds. That will change a little bit, as I'm cutting off some of the stock to add balance and adding some 6 ounce glass and epoxy to seal the back edge and the cut-back. However, "a little bit" is pretty surely only about a pound +/- .

i finally spent some money on this project... $13.77 at Home Depot for a 1/4 sheet of exterior glue ACX plywood.

The basic "box" for the cassette is made. It's blocks cut from free scrap doug fir 2 x 4's from the local lumberyard, 3/8 th's plywood and a bunch of the leftover s.s. exterior deck screws from building the deck on the back of the house a few years ago.

cassette-box1-sm.JPG

cassette-box2-sm.jpg
 

Attachments

  • cassette-box1.JPG
    cassette-box1.JPG
    991 KB · Views: 1,246
This morning I tried the fit of the rudder into the cassette. Oops. The plywood has a little bend to it, and the rudder wouldn't go in. So I took all the deck screws out of one side, and cut roughly 1/4-inch strips from the same 2 x 4 to add to make it a little bit wider. That got cut, glue'd with TiteBond wood glue, and stuck in place with a couple of brads, and then the cassette was screwed back together again. I then rounded off the edges with the sander and generally smoothed things up. The outer corners at the top and bottom of the cassette were rounded off a bit, as I'll be wrapping 4-inch glass tape 'round the entire box.

I mixed up some microballoons in epoxy and made a "fairing" spooge.

fairing-sm.jpg

I'm not sure that "fairing" is really the right term, but "smoothing" it is, for sure. I mixed it up until the stuff was about the consistency of cool peanut butter and then used a flexible nylon spatula to distribute it over the underwater part of the blade. This is the first side, the other side will get done in a couple of days. The goal here is to fill in any little holes in the weave, smooth over the worst of the bumps, and call it good. It'll get a cursory sanding with 120 grit, and that's enough for an emergency rudder. There's no point in fairing the stuff that will be inside the cassette, so I didn't.
 
Last edited:
Back
Top