• Ahoy and Welcome to the New SSS Forums!!

    As you can see, we have migrated our old forums to new software. All your old posts, threads, attachments, and messages should be here. If you see anything out of place or have any questions, please scroll to the very bottom of the page and click "Contact Us" and leave a note with as much detail as possible.

    You should be able to login with your old credentials. If you have any issues, try resetting your password before clicking the Contact Us link.

    Cheers
    - Bryan

i am making a rudder

I'm also, sort of simultaneously, working on an emergency rudder. Here are a couple of pictures of my killer woodworking shop. Yes, you can totally be jealous of my driveway. This is the emergency rudder under construction, not my primary rudder. You should see the workshops that most of the guys on the wooden boat forum have. I feel like a real piker when I show my photos over there.
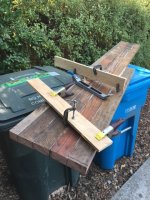
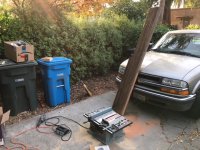
E-rudder001.jpg

E-rudder002.jpg

Finally, here's an offcut from the emergency rudder. I tried to torque it apart. The rudder is weathered redwood that's glue'd up with PL100 polyurethane adhesive... NOT epoxy, $6.99/tube Loctite PL100. You'll note that the wood broke before the joint gave up. Admittedly, the wood broke at a weak point near a knot, but still.
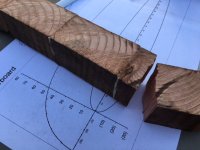

E-rudder003.jpg
 
Last edited:
Your workshop looks very similar to mine, even down to the blue and green work benches!
Good to know about the PL100, that will be very useful when I start my e rudder. Thanks
 
Your workshop looks very similar to mine, even down to the blue and green work benches!
Good to know about the PL100, that will be very useful when I start my e rudder. Thanks

So PL100 is actually no longer sold. Its been replaced by PLPremium. I'm just so used to writing and saying "PL100" that I still do it.

adhesive-loctite-pl-premium.jpg


It's the same stuff. Don't get the Loctite PL stuff for mirrors, for example, or for drywall. PL200 is the drywall stuff if I remember correctly. PL Premium is somewhat flexible, totally waterproof and seriously strong stuff. If you want to glue piece of wood A to piece of wood B, watertight, it's a much cheaper alternative than epoxy.

What's it's NOT, is something to goop all over a surface, and then embed fiberglass cloth, or even something like yellowjacket, in.
 
Is the "yellowjacket" reference sort of akin to embedding an insect in pitch and after several centuries making an amber necklace?
 
Is the "yellowjacket" reference sort of akin to embedding an insect in pitch and after several centuries making an amber necklace?

Ha!....nope. Yellowjacket is a "boat thing", but only if you have a wooden boat. I spent a lot of time many years ago, as the A.) head instructor B.) Chief Scientist and C.) assistant wooden ship fixer for the Marine Science Institute. Our ship was a WWII vintage air-sea rescue boat, 85 feet long. We had to replace the decks, there was bad rot aft of the wheelhouse. That meant tearing up acres of plywood, pulling hundreds of copper nails, and slathering everything with cuprinol. Then the plywood, also slathered with cuprinol, went down, two layers of it. On top of that...the surface we all walked on, we put on Yellowjacket and Arabol.

Yellowjacket is a yellow-colored polyester mesh. It's kind of like a very loose weave fiberglass roving, only it's not glass. Arabol is made by Borden, and it's basically white glue. So we stapled down two layers of yellowjacket with copper staples and then smeared about 10 gallons of arabol over everything...really thick. Wait 48 hours, pray it doesn't rain, and paint with a latex paint that has crushed walnuts in it for non-skid..

It sounds hokey but it held up for almost 15 years until they finally sold the ship. Wooden boats that don't have teak decks often use this for their deck covering, especially work boats.

Anyway, on the rudder front....

This is the boring part. Smear on epoxy and wood dough---wait overnight --- sand. Repeat. Repeat again. Use the belt sander to shape in some of the oddball tapers here and there. Turn over, and repeat. I'm one smear-wait-sand away from being done with one side. However, I've belt-sanded the second side, and then gone over it with the surform plane and then belt sanded again, so the basic shape is there. I'm shocked. The trailing edge is ramrod straight and pretty much exactly 1/4 inch thick for the entire length of the blade.
 
Last edited:
I just discovered that Arabol isn't made any more. It had some anti-fungal stuff added to it, that might explain it. Apparently the commericial fishermen use lagging compound...more or less the same stuff. ....sort of.
 
There are several rudders at Blue Pelican.
 

Attachments

  • rudders.jpg
    rudders.jpg
    78.1 KB · Views: 947
Last edited:
I know your well into your project but this outfit north of Seattle could be a good resource for used parts.

The Sailboat Wrecking Yard


http://sailboatwreckingyard.com

I contacted them twice and actually they came off as rather unpleasant via e-mail and even though I asked twice, they never sent along a list of the rudders they had in stock.

That's a pity, as they seem to have a lot of great stuff on-hand.
 
I must be making progress because I did about 45 minutes of sanding and then flipped the rudder over, today. The second side got it's first layer of fairing spooge... router shavings in epoxy for the areas where I need to build some volume quickly, and wood dough in epoxy for the little stuff. I expect there will be two more iterations of this.

Also, the foil template for the emergency rudder is done.
 
I thought I was done and ready for vacuum bagging, but I set up the rudder on the trailing edge and took a good, hard look at the leading edge and what's right behind it. It's good in the bottom third of the blade but one side is fatter than the other side in the top 2/3rds, with a significant divot, probably where I joined two pieces of wood. Aside from that divot, it's impossible to find that join, so that's good. Anyway, today I added some bulk to the "skinny side". I'll let it kick off tonight and hopefully sand it fair tomorrow, though it will probably need a treatment with epoxy/wood dough and another sanding.

I'd hoped to have the vacuum-bagging done before I went back to work on Jan.8th, but I don't think it's gonna happen. With luck, I'll have it for the Cruise-In.
 
OK, that's the last mix-spread-kick-and sand. We're in the "overnight kick" phase right now. After I spread some more wood dough and shavings for filler on the "skinny" side of the leading edge, I got to work on the Emergency rudder. I'm not going to be anywhere near as fussy about having a perfect shape for that rudder, and I think I'll use it for "practice for vacuum-bagging. I'd hate to screw up the primary rudder.

$148...$83 of stuff and $65 of shipping... worth of triaxial fiberglass, peel ply and bleeder has arrived at my house , enough to do both rudders and I'll probably have a lot left over.

OK, so this afternoon I spent about two and a half hours doing this...E-rudder005.JPG

Which resulted in this..

E-rudder004.JPG

This rudder is going to be a bit slab-sided, but not terribly so. I'm not worried about it. Note that I just did the after part of the rudder. I did one pass at the leading edge and the bit dug deep. So I stopped and it finally hit me why the leading edge on my primary rudder is so wonky and requiring so much build-and-fair. It has to do with the radius of the curve of the template, where there's lot of curve, and the flat surface of the router.

Instead, I'm going to cut a couple of 30 deg. cuts, lengthwise down the leading edge and then fair by hand.
 
Here's a close up of the freshly routed redwood surface. This makes a bluidy lot of sawdust! To smooth it, I go over it with a surform plane and then belt sand with 80 grit.

E-rudder006.JPG
 
I am working in my driveway, right?. I both drool and chuckle at the guys (and a few gals) on the Wooden Boat forum with their heated workshops, vacuum-evacuated planers and so on. One thing for sure, if I did this a lot, I would wear a respirator. That was a lot of dust, today.
 
I am working in my driveway, right?. I both drool and chuckle at the guys (and a few gals) on the Wooden Boat forum with their heated workshops, vacuum-evacuated planers and so on. One thing for sure, if I did this a lot, I would wear a respirator. That was a lot of dust, today.

Alan, think of all those people in the midwest and northeast who are living through minus degree weather. I'll bet they envy you your nice warm driveway. Heck, today I was sailing off the city front in blue skies wearing a light jacket. It's all in the perspective. You look like you have a nice work surface there in your driveway.
 
Last edited:
I spent my last day before going back to work doing -- 1: shaping the leading edge of the E-rudder with an archaic tool called a drawknife instead of putting it on the table saw. Also used a surform plane and a lot of sanding. It's not as sexy a shape as the primary rudder, but it's something like elliptical, sort of. It'll work and it's a good size. If the boat didn't come with a 1-D rudder the size of the Washington Monument, I'd say that the E-rudder i'm making was about the right size. this will be about 15% of the work as the primary rudder, for about 95% of the performance.

2: filled and faired the "skinny side" of the primary rudder 2x, due to the judicious use, off and on, of a heat gun. I could probably do this another 2x but I'm heartily sick of the activity and the "skinny" side is appropriate chubby now, to match the opposite side. This isn't as good as a CNC-cut pro job, but it's a lot better than some rudders I've used. Time to vacuum-bag.

NOTE TO ALL: If you ever have a chance to go see Greg Nelsons shop, do it. WOW. Just...so cool. Thanks for the loan of the vacuum pumps, Greg!

I need to prep the other side of the E-rudder ASAP 'cause I'm going to bag that one before doing the primary rudder. I figure, mess up the rudder that didn't cost anything but time, right?

I'm about $425 into this project.
 
Last edited:
Today is the last "routing day", which will also involve sanding and fairing with epoxy/redwood dough spooge. Tomorrow is the final sand, then then the E-rudder goes in the bag for the big experiment! If all goes well, Monday, the primary rudder will go in the bag. I may have enough triaxial cloth to do two layers of 19 ounce cloth, which will make it heavy but completely indestructible. Hmmm. Maybe too heavy. I gotta think on that.

EEEeeeEEEEeeeeEEEEeeeeee....:eek:

Joan is going to be bluidy glad she doesn't have to listen to that router again.
 
Last edited:
The nagging little sore throat that I've had for two days went nuclear this afternoon. Like, to Urgent Care, steroid injection,antibiotics injections and X rays nuclear. I couldn't swallow. It's strep throat, but this wan't your regular no-fun sore throat. Not so good. Four hours in Urgent Care, later I'm down to just a "bad sore throat", but I can at least eat popsicle.

I got that side of the rudder all routed out and spooge'd, this afternoon before it got super-bad. I don't think I'll be vacuum bagging anything tomorrow.
 
VACUUM BAG DAY!!

what a shi*tshow!!. I'm so glad I did the E-rudder first. Now I've made all my mistakes and know what to do differently for the primary rudder.

Mistakes...#1 I thought I cut the triaxial glass wide enough to cover the blade with an inch overlap for "flash". Nope. There might be some overlap at the trailing edge. Might not. It's that close. Lesson - cut 4 inches more than you think you need. #2.. well, mistake #1 took so much time to readjust that by the time we got the rudder in the bag, the epoxy was starting to gel. So I doubt that the breather pulled anything out. I certainly can't see any resin in the breather. The cloth and the peel ply are well soaked, though, so there will be a good bond.

Also, cut all the cloth out FIRST, BEFORE coating the rudder. Oh, well. This is why I did this rudder, first.

Here's what my garage looked like, cutting out breather while the rudder was on the table. Me=Dummy! I won't do that rudder-vacuum-bag-garagemess.JPGagain!
 
Back
Top