• Ahoy and Welcome to the New SSS Forums!!

    As you can see, we have migrated our old forums to new software. All your old posts, threads, attachments, and messages should be here. If you see anything out of place or have any questions, please scroll to the very bottom of the page and click "Contact Us" and leave a note with as much detail as possible.

    You should be able to login with your old credentials. If you have any issues, try resetting your password before clicking the Contact Us link.

    Cheers
    - Bryan

i am making a rudder

Joan helped me get the rudder in the bag I had for it, after doing all the layup, finding out that I hadn't cut enough triaxial to quite get to the trailing edge on both sides, removing it and laying it all in, again. Here it is, hanging from a line between two sawhorses.vacuum-bag1.JPG
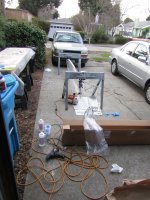
One end of the line is tied to my truck, the other end is tied to some Highland Games weights. There are bolts driven into the end of the rudder, with big washers on them. The bolts/washers fit into loops in the rope, to suspend the rudder off the ground, trailing-edge down.
vacuum-bag-hang1.JPG
 
Last edited:
Then, on with the pump....and another lesson...get the butyl tape on the bag BEFORE hanging it. Sealing the bag took 45 minutes, seriously. Oy, ve.

vacuum-bag-pump1.JPG

And finally, two space heaters going, and all tented up...

vacuum-bag-tent1.JPG
 
Greg says that the orange pump pulls air faster, so I ran it for about two hours. He loaned me another one, which I set up in the other end. It's been running for about an hour, now. I'll shut it down pretty soon. I never got a really excellent seal, so needed one or the other to be running to keep the bag down on the rudder. At this point the epoxy has started to seriously set up, so I doubt anything is going to get pulled into the breather. Anyway, neither of the pumps will run for more than 2 hours at a time.

I'm going to be moving the space heaters around under the "tent" until about 9:00 PM. That means they'll have been under heat for about five hours. Incidentally, there's more plastic on the "tent" now, so it's more or less touching the ground everywhere but one end. I estimate it's about 85 degrees at the "top" of the tent and 70 nearer the ground.

{{sorry for the big images}}
 
Last edited:
This has been a high-stress day. Hopefully what I've learned will make the next one lower stress, and with better results!

Also, very curious to see this rudder when it comes out. I'm concerned that I was a bit skimpy with the epoxy
 
Last edited:
It's the next morning. I un-tented the rudder and turned off the heat at about 10:00 PM last night. I strung it up in my 50-deg. garage overnight and went to bed. This morning I went out and pulled the peel-ply off. It did not want to come off all that easily. The laminate was very sticky. It was very tightly adhered to the wood, but sticky.

vacuum-bag-post-cure1.JPG
 
Good news, I have contact/coverage all along the trailing edge of the blade.
Badd, but not unexpected...The impossible "inside angle" of the leading edge where the stock is set back 3 inches from the blade is ugly...big surprise. I'll have to grind out about 5 inches of stuff. No biggie.

However, now I know why the bleeder didn't absorb any excess epoxy. There wasn't any. The mixture is rather epoxy-starved, darnit. There's a lot of bonding to the wood, but also areas that need more. I only found two very small "silvery" areas, in non-structurally important places, where the glass didn't wet out at all. However, this *meh* bonding is not good.

Upper half of rudder close-up..
vacuum-bag-post-cure-closeup-stock.JPG

Blade close-up..

vacuum-bag-post-cure-closeup-blade.JPG
 
Last edited:
Well, the rudder was still very tacky, so there were still chemical bonds forming. I quick-like got the rudder outside and hung it on some sawhorses. Then I mixed up some epoxy and wiped it on there. It took a surprising amount to fill in the weave, but it did wet out really well. Lesson Learned!

So this rudder is less than optimal. There is now probably too much epoxy in the epoxy/glass mixture for optimal strength. It'll be really strong, no question about that, but not optimal.

vacuum-bag-post-cure-fillin-hang.JPG

Here's a closeup of the top half.
vacuum-bag-post-cure-fillin-closeup-stock.JPG

Here's a closeup of the blade.

vacuum-bag-post-cure-fillin-closeup-blade.JPG

The fact that I did this while the overnight-coat was still pretty tacky is good. It will probably bond really well, and from the appearance of the rudder, it SEEMS like there's a lot more wood/glass/epoxy filling-in-the-gaps going on. Still, it's frustrating. However, this is why I did the E rudder first, before the primary rudder. Next time...MOAR EPOXY in the layup!!.
 
Last edited:
I really want to finish this one off, but I need to get the vacuum pumps back to Greg. Next weekend is the cruise-in, the weekend after that is the 3BF, but I have the afternoon, after I do RC to set up the primary rudder and bag it.
 
The epoxy kicked off all day yesterday and last night in the garage. Rudder finish looks really good, tight to the wood and smooth, yay! On to the primary rudder!
 
The primary rudder got it's second layer of unidirectional carbon today. As in, it got a 6-inch wide "tape" of it on the second side. One side already had carbon. This time I was a bit more generous with epoxy. Mentally processing what went less-than-optimally with the E-rudder, I also coated that whole side of the rudder with a light layer of epoxy. Hopefully that will seal the wood and it won't absorb so much on vacuum-bagging day, which is Saturday afternoon. I'll flip the rudder over tomorrow morning and give the other side an overall coat, as well. It's pretty cold in my garage so I bet the epoxy will still be forming a few chemical bonds, come Saturday.

I actually aligned it with the wrong edge...set back from the trailing edge instead of the leading edge. Fortunately I caught the goof pretty quickly, pulled it off and squeegee'd it back on again.

THIS time I will cut the cloth, peel ply and bleeder fabric BEFORE setting up the blade. I also have my friend Greg from church coming over to help. I put the non-glassed rudder on the bathroom scale today and it weighs 46 pounds. From the Class Rules..

"2.7.A.1. The minimum weight for the rudder assembly (rudder blade, box, gudgeons, tiller, normal hardware, and corrector weight, if any) is 61 lbs. "
 
Last edited:
This morning the other side of the primary rudder got a coating of "sealer" epoxy. The carbon strip on that side decided to drink some in, too, so I might have been kinda skimpy with the juice when I bonded it. Vacuum Bag #2 is tomorrow! I have a buddy coming over to help so there will be two pairs of hands. MUCH better..
 
Yesterday the primary rudder got vacuum-bagged. My friend Greg S. came over in the afternoon and between 1:00-5:00 we got it done. We prepped all the fabric before beginning, and with the two of us it was immensely easier than doing it alone. The rudder sat under vacuum and heat for about 2 1/2 hours before I turned stuff off and went to Burns Night. I'll un-bag it this morning. The only downside is that one end slipped off the sawhorse while I was adjusting it and fell about 10 inches straight down on my toes. I now have a broken big toe on my right foot. I'm headed to Urgent Care here in Palo Alto later this morning for some x-rays and probably a boot to wear for a month. There goes what remains of any training during the Highland Games off-season.

While we were at it, I cut off the extra flash on one edge of the E rudder stock and Greg got some 6 oz. glass and epoxy on it. I got two layers of 6 oz glass on the bottom of the e-rudder, so that is getting very close to being done.
 
I de-bagged the primary rudder today. This time the bleeder has pulled a significant amount of epoxy out of the mixture. 93% of the rudder is absolutely pristine. The bonding is tight, the weave is filled, the peel-ply finish is smooth. The center of the rudder where the loads will be highest is rock-solid. The ends aren't so great, and a bunch of glass will need to be cut off and patched in. The lower, aft corner of the trailing edge , well the glass got folded over somehow in the bag on one side, so there's about 4 inches of the trailing edge of that curve that will have to be patched in. However, this is a low-load zone so it's no biggie. There's one sort-of medium-sized bubble in the aft part of the transition from "boxy" to "foil" that I'm attempting to heat up and mash down. I've slit it with a razor, heated it up to melt the nearly-hard epoxy/glass, and got some fresh epoxy under it. I've energetically mashed it down, and a bigass Highland Games weight, which is round, is now sitting on it overnight. Yeah, there are some bits here and there that will need cutting out and patching in. But all in all, this rudder is a *Significant* improvement over the E-rudder. It will be plenty strong. Wherever the loads are high, the glasswork is really solid. I'm pleased.

After an uncomfortable night, I went to Urgent Care this morning. The PA melted a hole in my toenail, which soon was very messy. However, that relieved a lot of pressure. X Rays, to my surprise, reveal that there is no break. Considering the pain and spectacular colors I figured I broke it for sure. I've spent the day in an open toe'd orthotic shoe, and managed to walk several blocks around Berkeley to go to a concert and meet Mrs. Alan H's nephew for dinner. No surgery. No titanium pin in the toe.....things could be worse.

I'll put up some pics tomorrow.
 
Last edited:
OK, here are some close-ups of the laminate, taken in the middle of the rudder where the stresses are highest. I'm very pleased!

IMG_0238-sm.jpg

IMG_0242-sm.jpg
 
It's not perfect. In the interests of honesty and helping the poor sucker who comes along next month or next year and reads this thread as preparation for making their own rudder...here goes.

IMG_0240-sm.jpg

That one is a result of the rudder slipping off the sawhorse and onto my foot. The rudder is suspended by two bolts, one at each end, driven into the ends of the rudder. Each bolt sticks out 3-4 inches and the structure rests on that, on the sawhorses. My friend Greg S. and I pushed it back up on the sawhorse but probably caused this displacement. It's not a big deal, as it's not in a high-load area. I'll cut it off, grind it flat and wrap the top 5-inches of the rudder with another layer of triaxial, anyway.

The bottom of the rudder is kind of ugly. We got layers of breather in between the glass and the wood, so that messed it up. Also, one side of the cloth got turned over in the bag, but we couldn't see it through the breather. Ah, well... I'll have to grind out and fix that trailing edge, but again, not a super high-load area.

IMG_0243-sm.jpg
 
See that big weight? That's the only place on the whole rudder where there's a flaw that affects the strength in any way. After I unbagged it, I found a "bubble" where the glass hadn't adhered to the wood. I cut the semi-hard laminate in this area with a razor in the longitudinal direction in a couple of places. BAsically, I "popped the bubble". Then I warmed it up pretty good with a heat gun until it was really flexible. I smooshed some fresh epoxy underneath it. Then I added some weight!

IMG_0237-sm.jpg

I let it sit overnight and took a look this morning. Wow, it worked! Now, the whole bubble is not "perfect", some of it will have to be ground down and faired, but the part I smooshed with the weight and chain actually conformed to the wood pretty well. It just needs to be faired, now.

I've shown you all the flaws. The other side is essentially ~perfect~.

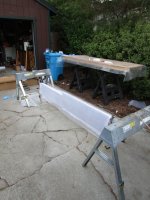
Here's a view of the table and layout. You can see my trucks rear-view mirror on the right. The truck wasn't there when we did the layup on this table.

IMG_0245-sm.jpg
 
Last edited:
This weekend I cut off the "flash", the excess fiberlass, with a cutoff wheel on a Dremel rotary tool. Well, OK, I have the Craftsman version of that tool. I ground out the worst of the "bubbles", not that they're bad, with an attachment on that tool as well.

This weekend I cut off the "flash", the excess fiberlass, with a cutoff wheel on a Dremel rotary tool. Well, OK, I have the Craftsman version of that tool. man, that thing is the ticket for that job. I ground out the worst of the "bubbles", not that they're bad, with an attachment on that tool as well.

What remains is the following...

1.) fill in the cut-out "bubbles" space and the "folded over" part at the bottom with a mixture of glass fibers in epoxy, and build them up to more-or-less flush with the rest of the rudder.
2.) get a layer or two of 6 ounce cloth on the bottom...sand and fair
3.) the trailing edge is a little thick, it's pretty darned straight, just thick. So I'm going to buy a 4 foot long strip of pultruded fiberglass rod, square in cross section rather than round. It'll be 1/4 inch on a side. I'll epoxy it in there on the trailing edge and fair it. That should give a nice, squared-off edge.
4.) once over the whole rudder with epoxy/microballoons to fill any little divots or places where the peel ply didn't quite stick
5.) paint - probably a two-part epoxy below the waterline and Interlux enamel above the waterline. Below the waterline will get two coats of black Petit Hydrocoat antifouling
6.) Install the custom pintles that I'm having made at my local welders
7.) Install and sail

All of this is pretty obvious to anybody else coming along in the future who is thinking about making their own rudder, so I think I'll leave this thread until the rudder is done. That's why I did the thread in the first place, for the next poor slob that thinks they want to build their own transom-hung rudder. There's no point in belabouring it. I'll post one last pic of the rudder before I mount it on the boat and call it good.
 
Last edited:
Actually, I bought the s.s. bits for the rudder gudgeons today. $90 at Alan Steel in Redwood City. That's just the cut and punched pieces of stainless, which still need to be welded together. Considering as Rig-Rite doesn't carry rudder pintles with 5/8ths inch holes, or holes larger than that which allow for a bushing between the pintle and the pin, I kind of had to do this. IN fact, NOBODY but Rudder Craft carries them, and RC won't sell theirs.

The closest thing that Rig-Rite has takes a 1/2 inch pin (not 5/8ths) has two holes (not three like mine) for bolts through the rudder, has 1 1/2 inch straps (same as mine) and is used on old Pearson 27's. Here are the specs on the P-27

Displacement 5800 lbs.
Ballast 2175 lbs.
Sail Area 330 sq. ft.

Here are the specs on my boat

Displacement 4500 lbs
Ballast 1750
Sail Area 326 sq ft.

I think I'm good to go as what I'm building is constructed the same way as those P-27 rudder gudgeons are, only beefier. You have to ask Rig-Rite for a quote to get a price on those puppies, they don't list the price on the website but I would guess they're around $350 a pair. Schaefers cast stainless J-24 gudgeons are $150 each, $300 a pair at West Marine.
 
Last edited:
It appears that I'm continuing to update.

Today I filled in all the places that didn't bond well under vacuum. I cut up a mess of fibers from leftover triaxial cloth and mixed them in to some epoxy. Then I artistically applied this stuff, which I will call "flooge", by hand to all the appropriate places. I had to go to TAP plastics for another quart of epoxy and hardener. While I was there I bought some 4-inch wide glass tape. The top of the rudder, where the tiller straps will be, is now wrapped in two layers of tape in epoxy.

This is probably preposterous overkill, but you know, halfway to Hawaii or something, I might be glad I did that.
 
Back
Top